
Last week we made a backup of our Oracle database using the RMAN tool. Today, I am going to show you how to be a hero and restore your database. This will be another long post, but saving your companies data is worth it.
In our example, we are going to assume that the server we are going to restore our backup on to mirrors our production server. That is, the install directory and the data directories are the same on both machines and they are both running the Windows operating system.
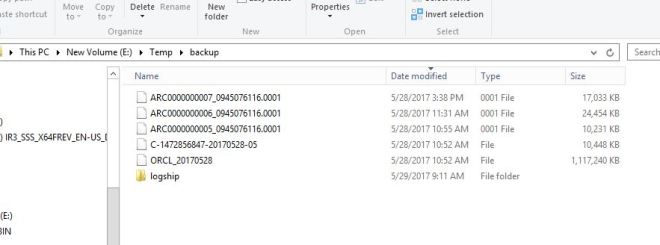
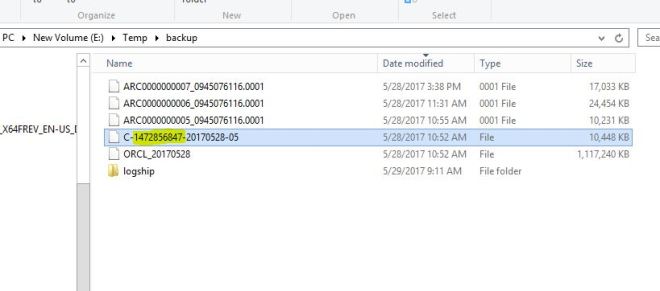
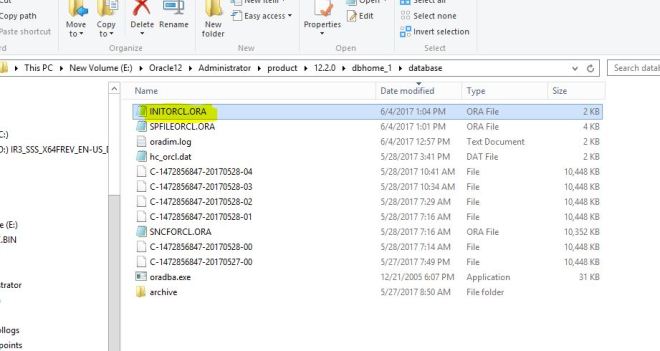
The first thing we need to do is identify our backups. You know that they are stored in this location (and they are copied to another location for redundancy): e:\temp\backup. Looking below you find the following files:
RMAN backup file: ORCL_20170528
Control and Spfile: C-1472856847-20170528-05
Archived log files: ARC0000000xxxxxxxx
Since we are on a Windows operating system, and we are manually creating/restoring this database, we need to run the ORADIM command. This basically creates the Orcl service needed for this database. You can read more about this command here:
https://docs.oracle.com/cd/B19306_01/win.102/b14304/create.htm#NTQRF352
C:\>oradim -new -sid orcl -startmode a -intpwd secretpass
I am passing -new -sid to create a new database called ORCL. -startmode a means to start the service automatically. -intpwd is the new password you want to use for the SYS user for this database, I picked the unsecure: secretpass, which the program complains about below. It still allows me to use that weak password, but gives a warning.

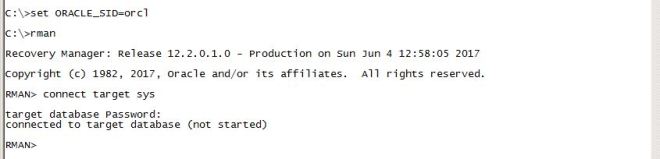
After the service is created, we need to set the ORACLE_SID so we connect to the appropriate database. Then we invoke RMAN and connect.
C:\>set ORACLE_SID=orcl

C:\>rman

Recovery Manager: Release 12.2.0.1.0 - Production on Sun Jun 4 12:58:05 2017

Copyright (c) 1982, 2017, Oracle and/or its affiliates.  All rights reserved.

RMAN> connect target sys

target database Password:
connected to target database (not started)

RMAN>
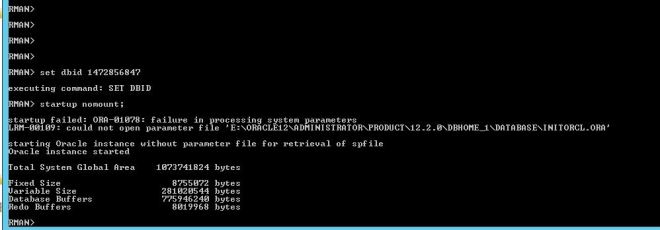
From the RMAN prompt we need to set the DBID, which is part of our Controlfile/Spfile backup filename. In this case 1472856847. Then we startup the database with the NOMOUNT parameter. This will start up the database with a default pfile/spfile that has minimal parameters. We are going to restore the correct Spfile further down.
RMAN> set dbid 1472856847

executing command: SET DBID

RMAN> startup nomount;

startup failed: ORA-01078: failure in processing system parameters
LRM-00109: could not open parameter file 'E:\ORACLE12\ADMINISTRATOR\PRODUCT\12.2.0\DBHOME_1\DATABASE\INITORCL.ORA'

starting Oracle instance without parameter file for retrieval of spfile
Oracle instance started

Total System Global Area    1073741824 bytes

Fixed Size                     8755072 bytes
Variable Size                281020544 bytes
Database Buffers             775946240 bytes
Redo Buffers                   8019968 bytes

RMAN>
To restore our Spfile, we use the following restore spfile command:
RMAN> restore spfile from 'e:\temp\backup\C-1472856847-20170528-05';

Starting restore at 04-JUN-17
using target database control file instead of recovery catalog
allocated channel: ORA_DISK_1
channel ORA_DISK_1: SID=18 device type=DISK

channel ORA_DISK_1: restoring spfile from AUTOBACKUP e:\temp\backup\C-1472856847-20170528-05
channel ORA_DISK_1: SPFILE restore from AUTOBACKUP complete
Finished restore at 04-JUN-17

RMAN>

Then above we exit RMAN and connect to the database using SQLPlus to create a pfile from our spfile that we just restored. Usually you will need to modify the pfile to change directories or memory settings, but since our new server matches our production server, we do not need to make any changes to the pfile.
C:\>sqlplus /nolog

SQL*Plus: Release 12.2.0.1.0 Production on Sun Jun 4 13:02:43 2017

Copyright (c) 1982, 2016, Oracle.  All rights reserved.

SQL> create pfile from spfile;
SP2-0640: Not connected
SQL> connect / as sysdba
Connected.
SQL> create pfile from spfile;

File created.

SQL>
SQL>
SQL>
SQL>
SQL>
SQL> shutdown immediate;
ORA-01507: database not mounted


ORACLE instance shut down.
SQL>
The pfile gets created in the Database directory of wherever you installed Oracle and is called initorcl.ora in our example.
We can open this file in notepad and make any changes to the settings. For this example no changes are needed.

Now we need to startup the database with the Nomount parameter and point it to our modified pfile.
SQL> startup pfile=E:\Oracle12\Administrator\product\12.2.0\dbhome_1\database\initorcl.ora nomount;
ORACLE instance started.

Total System Global Area 1946157056 bytes
Fixed Size                  8748328 bytes
Variable Size             570426072 bytes
Database Buffers         1358954496 bytes
Redo Buffers                8028160 bytes
SQL>

Once the database starts up, we want to create a working Spfile from the settings (if we made any in our pfile), we need to use this command and then we shutdown the database:
SQL>
SQL>
SQL> create spfile from pfile;

File created.

SQL>
SQL>
SQL> shutdown immediate;
ORA-01507: database not mounted


ORACLE instance shut down.
SQL> exit
Disconnected from Oracle Database 12c Enterprise Edition Release 12.2.0.1.0 - 64bit Production

C:\>
Now we neeed to run RMAN again and startup the database in a Nomount state.
C:\>rman

Recovery Manager: Release 12.2.0.1.0 - Production on Sun Jun 4 13:54:18 2017

Copyright (c) 1982, 2017, Oracle and/or its affiliates.  All rights reserved.

RMAN> connect target sys

target database Password:
connected to target database (not started)

RMAN> startup nomount;

Oracle instance started

Total System Global Area    1946157056 bytes

Fixed Size                     8748328 bytes
Variable Size                570426072 bytes
Database Buffers            1358954496 bytes
Redo Buffers                   8028160 bytes

RMAN>

Now we need to restore our Controlfile, we use the restore controlfile command for that.
RMAN> restore controlfile from 'e:\temp\backup\C-1472856847-20170528-05';

Starting restore at 04-JUN-17
using target database control file instead of recovery catalog
allocated channel: ORA_DISK_1
channel ORA_DISK_1: SID=16 device type=DISK

channel ORA_DISK_1: restoring control file
channel ORA_DISK_1: restore complete, elapsed time: 00:00:01
output file name=E:\ORACLE12\ADMINISTRATOR\ORADATA\ORCL\CONTROL01.CTL
output file name=E:\ORACLE12\ADMINISTRATOR\ORADATA\ORCL\CONTROL02.CTL
Finished restore at 04-JUN-17

RMAN>
After the controlfile is restored, we can then Mount the database.
RMAN> alter database mount;

Statement processed
released channel: ORA_DISK_1

We can now see all of our settings that are currently in effect for our RMAN session using the show all command. If we need to modify any settings, we do it now.
RMAN> show all;

RMAN configuration parameters for database with db_unique_name ORCL are:
CONFIGURE RETENTION POLICY TO REDUNDANCY 1; # default
CONFIGURE BACKUP OPTIMIZATION OFF; # default
CONFIGURE DEFAULT DEVICE TYPE TO DISK; # default
CONFIGURE CONTROLFILE AUTOBACKUP ON;
CONFIGURE CONTROLFILE AUTOBACKUP FORMAT FOR DEVICE TYPE DISK TO 'e:\temp\backup\%F';
CONFIGURE DEVICE TYPE DISK PARALLELISM 1 BACKUP TYPE TO BACKUPSET; # default
CONFIGURE DATAFILE BACKUP COPIES FOR DEVICE TYPE DISK TO 1; # default
CONFIGURE ARCHIVELOG BACKUP COPIES FOR DEVICE TYPE DISK TO 1; # default
CONFIGURE CHANNEL DEVICE TYPE DISK FORMAT   'e:\temp\backup\%d_%T';
CONFIGURE MAXSETSIZE TO UNLIMITED; # default
CONFIGURE ENCRYPTION FOR DATABASE OFF; # default
CONFIGURE ENCRYPTION ALGORITHM 'AES128'; # default
CONFIGURE COMPRESSION ALGORITHM 'BASIC' AS OF RELEASE 'DEFAULT' OPTIMIZE FOR LOAD TRUE ; # default
CONFIGURE RMAN OUTPUT TO KEEP FOR 7 DAYS; # default
CONFIGURE ARCHIVELOG DELETION POLICY TO NONE; # default
CONFIGURE SNAPSHOT CONTROLFILE NAME TO 'e:\temp\backup\snap_orcl.cf';

RMAN>

Now we need to tell RMAN what backup file to use to restore from. Catalog Backuppiece is the command to be used here.
RMAN> catalog backuppiece 'e:\temp\backup\ORCL_20170528';

cataloged backup piece
backup piece handle=E:\TEMP\BACKUP\ORCL_20170528 RECID=16 STAMP=945784768

RMAN>

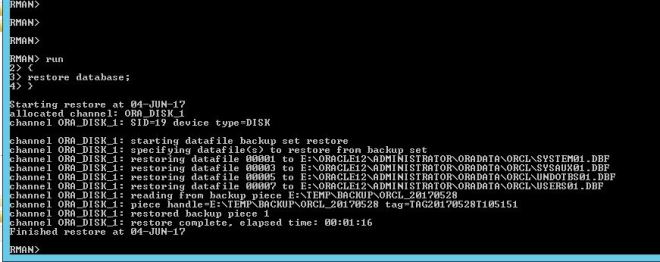
Now we can Restore the database using the Run command. This puts all of the database files into the correct directories. If we were restoring to a different location we would need to use additional commands.
RMAN> run
2> {
3> restore database;
4> }

Starting restore at 04-JUN-17
allocated channel: ORA_DISK_1
channel ORA_DISK_1: SID=19 device type=DISK

channel ORA_DISK_1: starting datafile backup set restore
channel ORA_DISK_1: specifying datafile(s) to restore from backup set
channel ORA_DISK_1: restoring datafile 00001 to E:\ORACLE12\ADMINISTRATOR\ORADATA\ORCL\SYSTEM01.DBF
channel ORA_DISK_1: restoring datafile 00003 to E:\ORACLE12\ADMINISTRATOR\ORADATA\ORCL\SYSAUX01.DBF
channel ORA_DISK_1: restoring datafile 00005 to E:\ORACLE12\ADMINISTRATOR\ORADATA\ORCL\UNDOTBS01.DBF
channel ORA_DISK_1: restoring datafile 00007 to E:\ORACLE12\ADMINISTRATOR\ORADATA\ORCL\USERS01.DBF
channel ORA_DISK_1: reading from backup piece E:\TEMP\BACKUP\ORCL_20170528
channel ORA_DISK_1: piece handle=E:\TEMP\BACKUP\ORCL_20170528 tag=TAG20170528T105151
channel ORA_DISK_1: restored backup piece 1
channel ORA_DISK_1: restore complete, elapsed time: 00:01:16
Finished restore at 04-JUN-17

RMAN>
We next need to point RMAN to where the archive redo logs are located.
RMAN> catalog start with 'e:\temp\backup';

searching for all files that match the pattern e:\temp\backup

List of Files Unknown to the Database
=====================================
File Name: E:\TEMP\BACKUP\ARC0000000005_0945076116.0001
File Name: E:\TEMP\BACKUP\ARC0000000006_0945076116.0001
File Name: E:\TEMP\BACKUP\ARC0000000007_0945076116.0001
File Name: E:\TEMP\BACKUP\C-1472856847-20170528-05

Do you really want to catalog the above files (enter YES or NO)? yes
cataloging files...
cataloging done

List of Cataloged Files
=======================
File Name: E:\TEMP\BACKUP\ARC0000000005_0945076116.0001
File Name: E:\TEMP\BACKUP\ARC0000000006_0945076116.0001
File Name: E:\TEMP\BACKUP\ARC0000000007_0945076116.0001
File Name: E:\TEMP\BACKUP\C-1472856847-20170528-05

RMAN>

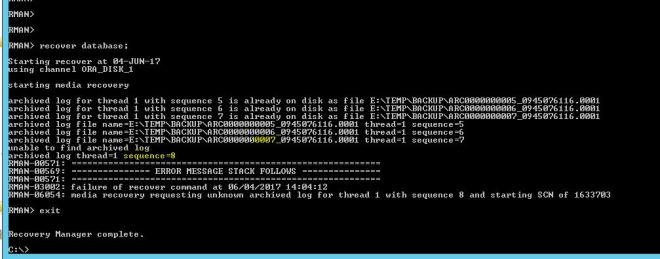
Now we can finally Recover the database. Notice the error below. It is looking for archive log #8, but since we only had through #7, it showed an error. This is ok for our situation, since that is the last log we had available. After this finishes exit from RMAN and go back into SQLPlus.
RMAN> recover database;

Starting recover at 04-JUN-17
using channel ORA_DISK_1

starting media recovery

archived log for thread 1 with sequence 5 is already on disk as file E:\TEMP\BACKUP\ARC0000000005_0945076116.0001
archived log for thread 1 with sequence 6 is already on disk as file E:\TEMP\BACKUP\ARC0000000006_0945076116.0001
archived log for thread 1 with sequence 7 is already on disk as file E:\TEMP\BACKUP\ARC0000000007_0945076116.0001
archived log file name=E:\TEMP\BACKUP\ARC0000000005_0945076116.0001 thread=1 sequence=5
archived log file name=E:\TEMP\BACKUP\ARC0000000006_0945076116.0001 thread=1 sequence=6
archived log file name=E:\TEMP\BACKUP\ARC0000000007_0945076116.0001 thread=1 sequence=7
unable to find archived log
archived log thread=1 sequence=8
RMAN-00571: ===========================================================
RMAN-00569: =============== ERROR MESSAGE STACK FOLLOWS ===============
RMAN-00571: ===========================================================
RMAN-03002: failure of recover command at 06/04/2017 14:04:12
RMAN-06054: media recovery requesting unknown archived log for thread 1 with sequence 8 and starting SCN of 1633703

RMAN> exit


Recovery Manager complete.
After going into SQLPlus, we need to alter the database to open and reset the redo log start point from 7 back to 1 since we created a new database. We then shutdown the database and restart it just to make sure there are no errors with our restore. You can also look in the Alert.log file to make sure.
C:\>
C:\>sqlplus /nolog

SQL*Plus: Release 12.2.0.1.0 Production on Sun Jun 4 14:05:33 2017

Copyright (c) 1982, 2016, Oracle.  All rights reserved.

SQL> connect / as sysdba
Connected.
SQL> alter database open resetlogs;

Database altered.

SQL> shutdown immediate;
Database closed.
Database dismounted.
ORACLE instance shut down.
SQL>
SQL>
SQL> startup;
ORACLE instance started.

Total System Global Area 1946157056 bytes
Fixed Size                  8748328 bytes
Variable Size             570426072 bytes
Database Buffers         1358954496 bytes
Redo Buffers                8028160 bytes
Database mounted.
Database opened.
SQL>
SQL>

If we run the archive log list command again on this new database, we can see the log number got reset to #1 since we opened the database with the resetlogs command.

Whew! That was a lot of work, but it is a great learning experience to recover your database using the command prompt. If you practice this 2 or 3 times, it will become second nature and you will know that your backup/restore strategy works. Also the more you practice, the less you will be stressing when you need to do this in real life.

This is the clearest RMAN I’ve found for replicating a database based on backups, and unless there’s a 10 Gigabit network, the fastest way is to copy the backup file to the target machine via SSD.
LikeLike
Thanks! I am glad you found it worthwhile.
LikeLike